Wednesday, July 3, 2013

The Battle of Osterholz north of Bremen


Please excuse the long absence of your chronicler dear blogger, a variety of duties called.   Let me now bring us back to Hanover, August 1757, when there was some significant maneuver by French and Allied forces.  These maneuvers resulted in two lesser “flying-wing” actions to be fought north and south – and two potentially more significant actions in the storming of Hannover proper. 
 

The first real action of 1757 (and the Campaign for that matter) was fought last week when the Allied master tactician Von Sabo visited Zap’s Duchy from Sabo's more arid lands to the southwest.  During the visit, much good food, vino and beer was sauffed and quaffed – with many old friends (significantly of the Paddocki and Gray tribes) also reunited.   Not a few games of martial chance were also endeavored, with this action being but one.  We fought the action using "Black Powder" modified by just a few minor house rules. Now on to the battle!
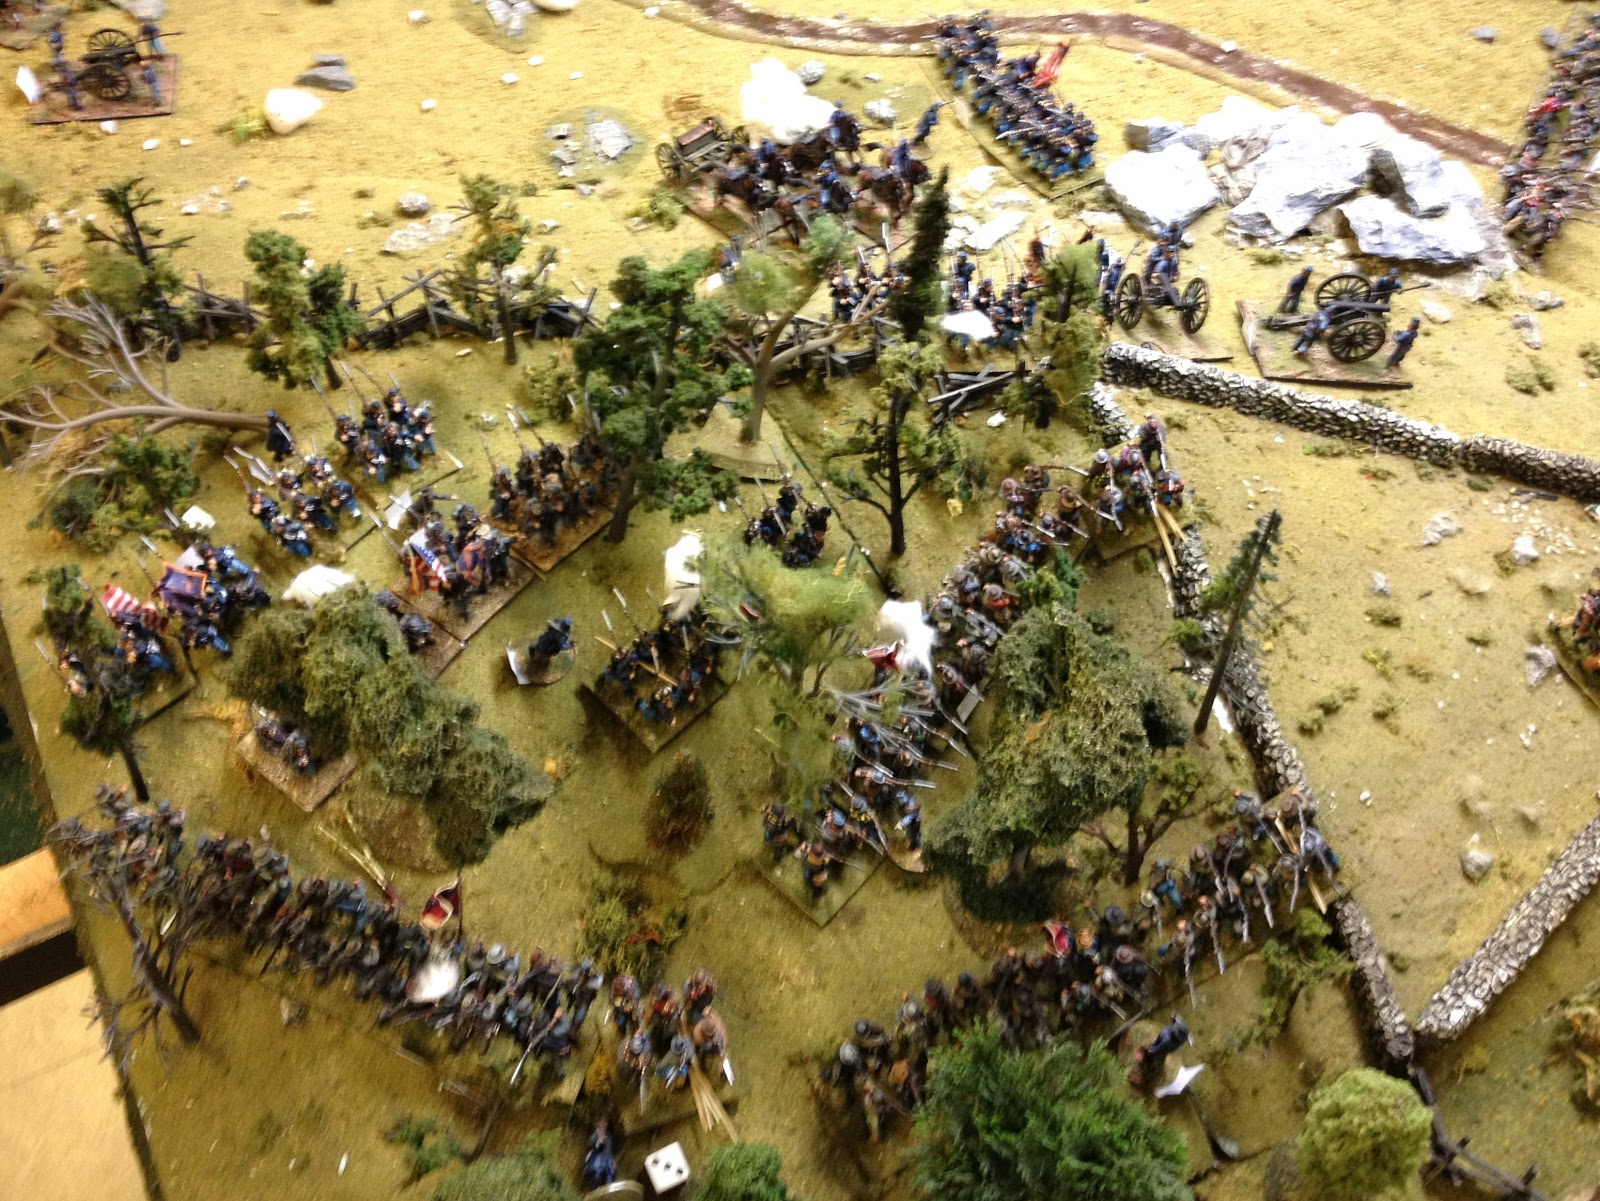
As Marschal Beaudoin’s force entered Bremen in early August, he immediately ordered pickets to screen east and north in the direction of the Allies.  As his forces were few, and the Allies in this area potentially many - he understood he would need to fight any counter-thrust on ground of his choosing.  Therefore, when Baudoin received word that Allied Brigadier Von Hardenbeck had debouched Bremerhaven with a strong force of grenadiers, jaegers and artillery, he moved just North of Bremen to a fortified farmstead near Osterhloz to give battle.  
The French Defensive Positions
Von Hardenbeck duly arrived within the week and immediately deployed from column to battle line.  To his front, he observed the French deployed in a rough defensive line with their center anchored by a small light battalion of the Volontaires de l'armée in the Hof Leuchtenberg farmstead.  To the flanks of this little hedgehog were their 4 pdr (right) and 6 pdr battery (left), and to the left of this elements of the (German) Saint-Germain Infanterie Regiment.  Finally, to the right of the French position were two squadrons of Dragoons, from the Harcourt and Orléans Regiments.   These Dragoons and the Allied lack of cavalry would give pause to Von Hardenbeck’s Teutonic martial ardor.
Von Hardenbeck directs his deployment

Under the tutelage of the ever watchful Von Sabo
 

Von Hardenbeck deployed his 6 pdr batteries in the center supported by Hessian Grenadiers and Hanoverian Jaegers in reserve – primarily to guard against fast moving French Dragoons.  He deployed two grenadier battalions (the Brunswickers and Hanoverians) in field columns on his right. The overall approach was cautious, risking some success in the main assault by maintaining a strong reserve to counter any French cavalry riposte.
 The ball was opened by desultory cannonading from both sides, as Von Hardenbeck initiated the attack of his small force of grenadiers with a cry of:

  “Vorwats Marsch Mein Kinder!”


French Commander studies the "champ de bataille"
 
The Grenadiers valiantly advanced, then charged through chest high ripened Korn – their target: fellow Germans of the Saint-Germain Infanterie.   As they Allies approached the fence line in good order, the Saint-Germain loosed a deadly volley and its adjacent 8 pdr battery threw in grape and canister for good measure.
 The Hanoverians took this fire, but the Brunswickers (receiving both musketry and artillery fire) took more significant casualties and were disordered in the attack.  As the charge drove home, the stout Saint-Germain Infanterie repulsed the Hanoverians, and routed the Brunswickers – the Brunswick grenadiers flying rearward past Von Hardenbeck without a scant second glance.  “Was gibt’s mit dir - blaue schwinehunde” he was heard to scold a passing Brunswick grenadier. 
Hanoverian (L ) and Brunswick (R) Grenadiers charge the Saint-Germain Infanterie

A Deadly Defensive Fire!
 
As Von Hardenbeck was unwilling to commit his reserves in the face of French Dragoons, the initial Allied rebuff, in-effect ended the Allied attack.   Von Hardenbeck began a tactical retrograde and sent an emissary to parley and buy time.  The emissary was received coldly by the French, and they promptly came out of their positions to counter-attack.   Beaudoin was determined to turn this brief  repulse into and Allied rout and then march on Bremerhaven!
The Allied commander is but a little displeased at the rout of the Brunswick Grenadiers.


Beaudoin orders a General Advance.
But the wily Von Hardenbeck had other plans, and he skillfully began a tactical retrograde to preserve his small force - especially his valuable guns.  The French rushed forward, with Dragoons threatening to overrun Jagers defending the mill. The small Volontaires de l'armée battalion advanced on the guns and the Saint-Germain Infanterie likewise advanced, nipping at the heels of the retreating Hanoverians.  "En Avant!"

But just as all seemed lost for the Allies, the French advance (now masking their own artillery) stumbled, and the Allies issued one good close range fire from their infantry, and now un-masked batteries.  The “Whiff of Grape” entered French nostrils as both infantry battalions suffered casualties and were disordered.  This left the French now in a quandary as their Dragoons could possibly sweep the Allied lines in a headlong charge, but if unsuccessful, the now disordered French infantry might be routed by another round of Allied artillery and musketry – with all being lost!

French Dragoons advance at the trot.

Hanoverian Jaegers exchange effective fire with the Voluntaries de la' armee and the threatening Dragoons
 
And the Allied Guns speak a six, disordered - merde!

Despite having prematurely quaffed the better part of bottle of celebratory Cabernet, (Hardenbeck’s swarthy advisor Von Sabo was seen to consume an equal amount of his favored Italian vintage) Beaudoin found discretion the better part of valor and sent his own emissary forth amidst the smoking guns to parley with the Allies.   An Allied withdrawal was permitted, with remaining Allied infantry and guns being brought off in good order.

A new Parlay amidst the fire
  So the results of the small, but not insignificant  “Battle of Osterholz” were French consolidation in Bremen and Allied withdrawal to Hagen.  One Allied battalion was routed with potentially significant casualties, and all other Allied and French forces were exhausted and somewhat bloodied but essentially unhurt.  Beaudoin was heard to say after the battle:  “ Messieurs, today we have seen a battle won – and then almost lost. Un autre jour, mes amis !”
Von Sabo - satiated, satisfied and soused...with vino and a successful tactical withdrawal - having saved his guns for another day!

French Commander, also feeling little pain after equal dosages of  claret and a hard fought action with his old adversary - and good friend.  Un autre jour, mes amis !
 

Sunday, May 12, 2013

Hood's Attack - 2 July 1863

Rose of Alabamy!


Satruday, Chris Hughes put on an outstanding American Civil War game at his house, with his superb collection of Sash and Saber 40mm castings.  The scenario was Hood’s Attack at Gettysburg on July 2nd 1863. This game was made all the better by the fine company of Raleigh gamers from the Triangle Simulations Society, vittles provided by the Host and Hostess and of course good beer!    As you may know, Chris is the sculptor/owner of Sash and Saber and Saber - and an opportunity to participate in one of his games is always a privilege.  If anyone has an interest in fine 40mm castings, I urge you to strongly consider Sash and Saber:  http://www.sashandsaber.com/

I may add few after-action comments in the coming days but for now please enjoy some pictures of the  game -


Chris answers in-game questions while pointing to Devil's Den on the beautiful 6' x 12' layout

Part of Strong Vincent's Brigade crests Little Round Top

Confederate attack develops in front of the Slaughter Pen and Hauck's Ridge

Union Battery and Infantry on Hauck's Ridge attempt to stem the tide

The iconic 20th Maine comes into line just in time on Little Round Top


Union crisis point on Hauck's Ridge and near the Slaughter Pen


Envelopment on Hauck's Ridge


Hood's Rebs boiling into valley between the Round Tops and Hauck's Ridge


44th NY about to stand and deliver


Maine and Alabama boys face-off


The extreme Left of the union line: In the saddle of the Round Tops, the 83rd PA deploys from column to the left of the 20th ME in an attempt to flank  the Rebel line

Late in the Day, foreground: Vincent's Brigade deployed on the forward slope of Little Round Top and flanking in the saddle meets Oats and Law. Background: Confederates storm over Hauck's Ridge and through Devil's Den to meet fresh Union reinforcements entering from the Wheat Field.  Will the Federals hold?


Ed Mohrmann's After Action Report-

The rules were Butternut and Bucktail, the venerable
home-grown ACW tactical rules which Chris has used
for years and the terrain was of course his usual
museum-diorama quality. Coupled with the 40mm
Sash and Saber figures painted to a high standard, it
made for a superb display.

This game is headed for Historicon and if you couldn't
make it to his house this past w/e, DON'T miss it at
the convention.

As to the game: basically, Ward's brigade of Birney's
Division of Sickles' Corps is defending the far left
of Sickles' position, posted along Houck's Ridge, with
sections of Smith's battery deployed right near Devil's
Den and a section down to the right rear along the
branch of Plum Run which runs to the rear of the ridge.

Vincent's brigade (part) was deployed way to the rear of
Houck's Ridge, about the crest of Little Round Top.

Reinforcements would be arriving (Weed's Brigade, Hazlett's
Battery, others) throughout the game, but of course no one
could say when.

Hood's Division was deployed in kind of an L shape, with
Robertson's brigade (mostly Texans) deployed along the
branch of Plum Run which ran at the foot of Houck's Ridge
on the N side. The other two brigades were deployed
along the table-side mostly parallel to Robertson,
preparing to attack through the woods towards Little Round
Top.

Your correspondent had command of a portion of Ward's
brigade deployed in or near the aptly name 'Slaughter
Pen'.

And so it proved. Robertson's Texans stormed across Plum
Run, charged through the woods along the Ridge and destroyed
one Union regiment (well, it self-immolated, being trapped
and launching a desperate charge which did cause A
Confederate casualty) and cause the rest of the defenders
to either withdraw in haste or rout, the two sections
of Smith's battery being abandoned and over-run.

Vincent, solicitous as always of comrades-in-arms' well-
being, ordered his band(s) to play 'martial airs and
rousing patriotic music' to support Ward's beleaguered
casualties-in-waiting.

Of course, Vincent had his own problems, as the doughty
Alabama regiments of Law's brigade could be heard
advancing through the thick woods towards Vincent's
position, the Georgia troops of Anderson to the left
of Law, ready to reinforce Law or to complete the
destruction of Ward et al in the Plum Run valley.

At this point, with Ward shattered, Vincent pinned and
Weed (and others) just entering, the game was called,
a clear Confederate win given the large number of
Union troops off the table (KIA/WIA/POW) and the
critical fight (LRT) to come with Anderson totally
free to join Law in tne attack.

Confederates were ably lead by Greg (Robertson's
Brigade), Lyle (Hood hisself and the Reb artillery),
Ron O. (a portion of Anderson), Steve (a portion
of Anderson and Law) and Bob E. (Law).

Union forces were under the command of Joe B. and
Dave B. (Vincent, et al) and Ron S. and your
faithful correspondent (Ward's brigade, other
Sickles' elements and Smith's battery).

Dave P. stopped by to visit and socialize.

Thanks to all who came for a good afternoon's
game and great company ! And ALWAYS thanks to
Chris for a wonderful table and a great game !


Saturday, May 11, 2013

Fine 54mm Figures


Over the past year, I have purchase some beautiful 54mm collectors quality figures from a gentlemen in the Ukraine.  While I have painted many 54mm figs, both singly and en masse – I unfortunately have yet to put brush to these.  I can however say, for the low price – they are the finest figures available.  They are so nice in fact, that I currently have them on display unpainted – as they come in an attractive Pewter color with a black wash.  I found them as “54mm Tin Soldiers” on e-bay: 

http://stores.ebay.com/strongseller


While the shipping time is not insignificant (unless you live in Kiev!) the wait is worth it.

I have no personal connection to this gentleman, but can vouch for his attention to detail and sculpting ability. 


Saturday, May 4, 2013

August 1757 Maneuver

Sauve qui peut!  Marauding Teutonic cavalry overrun a French supply train


We recall that in July, the French advanced on a broad front with numerous columns. The Main French“Column Principale” under d’Estrees drove like a juggernaut for Hanover's captiol city. The Army of Observation Quietly remained in its positions, observing and evaluating the French advance. Only near Wunsdorf was there potential action. Alas, the Allied Light Brigade was far too swift and escaped the clutches (a good Allied D6 roll) of Chevert’s strong column, withdrawing to join the 1stBrigade in Hanover.

With August came three thousand French reinforcements (300 Army Points with a good French D3 roll) and a renewed French advance, but this time the, the Duke of Cumberland (with the military guidance of his little known deputy – Hasso Von Sabo - pictured below) had maneuver plans of his own. In the far north (see map below) the Allied 4thBrigade debouched from Bremerhaven to attack the Flank of the French Army recently arrived in Bremen. Fortunately, the French commander sent some additional reinforcements to these weak screening forces under Marshal Baudoin, and ordered him to defend in place. Though they have a slight numerical advantage, attacking Allied Grenadiers should have no easy day in the fields north of Bremen.

Meanwhile in the center, Chevert’s Column also received some additional Infantry and Artillery supports, allowing him to leave general Maupeon with a small brigade to secure Wunsdorf, then take his main column to the northeast, threatening Hamburg. This move just missed a strong Allied cavalry brigade under Von Dachenhausen, whose orders were to drive hard to the West for the French rear to capture and cut the supply of the main French Army. In the South, the Allied 2nd Brigade moved towards a relief in place with the other independent Allied cavalry brigade, enabling Von Urff to slip northward past Berecheny and execute a southern pincer mirroring Von Dachenhausen’s in the North. This als resulted in 2nd Brigade moving to relieve Von Urff in running into elements of Bercheny’s Column moving to the East. These forces have a pending meeting engagement in the hills north of Kassel

The marauding Allied cavalry brigades are now sending strong patrols into their zone of control and effectively cutting the supply to three-fourths of the French Army in the center. A bold and successful maneuver by the Allied commander as advised by the sometimes brilliant Von Sabo. While it appears the Allied cavalry brigades may also be out of supply, the double envelopment will have more significant attrition effects on the French at the end of August.

Supply issues notwithstanding, so the massive French “Column Principale” proceeds in its attack on Hanover, supported by a flank attack from the South from Vogue’s Avant Garde. Expecting this attack, the Allies concentrated their 1stBrigade and Light Division to defend Hanover, and ordered the 3rdBrigade to march southward “um den Klang der Kanonen“. This could be the decisive batel of 1757.

So three battles are pending resolution in August:

North of Bremen near the village of Osterholz, Baudoin defends against the attacking Allied 4th Brigade

North of Kassel in the valley between Immenhausen and Grabenstein, the Allied 2nd Brigade meets Bercheny.

And the Battle Royale will take place at the gates of Hanover as d‘ Estree and Vogue ataack the Duke of Cumberland leading the three Brigades of the Allied Army of Observation.

We expect to fight these battels using Black Powder rules and our 40mm Minatures via Skype and/or in-person. Expect colourful battel repots in a few weeks time.


Spotted at the Duke’s Badminton Tourney near Bremerhaven in June - the sometimes brilliant strategist and advisor Hasso Von Sabo is seen where he typically can be found:  center left, with his prodigious proboscis in close proximity to the Duc of Cumberland's derrière!
 

Wednesday, May 1, 2013

That Special Figure...

Gentlemen, we never fire first; fire yourselves!


I am sure many of you share my impression of mid-18th Century European battles playing out as initially very structured, ceremonial, parade-like ceremonies that rapidly devolved into bloody mayhem and chaos.   The archetypal example of this is the exchange at Fontenoy between an officer of the Gardes Françaises , and Lord Charles Hai, a captain in the English Guards who cried, "Gentlemen of the French Guards, fire!" - with the Comte d'Auteroche, then lieutenant of Grenadiers, replying, "Gentlemen, we never fire first; fire yourselves."   Bloody mayhem ensued.

As I build an army of 40mm Prince August French – primarily from the timeless sculpts of the great Holger Eriksson – I was missing “that” figure.   The figure of the French officer doffing his tricorne to the enemy, while issueing some ridiculously pompous, vain, honorable or valiant statement prior to receiving a ball to the head.  I determined to do the unthinkable – modify one of Mr. Eriksson’s elegant semi-rounds to achieve the effect.  A figure form the PA artillery crew set became the object of my simple modifications.

Pictured is the result.   I have home-cast eight of these figures, of which I will have 3-4 in my army and distribute the rest to friends with an interest.  As I have yet to paint a Gardes Françaises  battalion, I painted the first new casting as a more generic French company grade officer.  Hope you like him.


L to Right - new casting,  modified artillerist, original Eriksson artillerists

 
The great sculptor and figure maker - Holger Eriksson

Sunday, April 28, 2013

July 1757 Orders are in, the Campaign for Hanover enters a new phase


Hanoverian Jäger zu Fuss skirmish with a French avant garde at the approaches to Wunsdorf


The French drove ahead aggressively with a variety of small and large columns, attempting to gain towns, territory and threaten major cities.  The Army of Observation assumed a regional defensive posture with many flexible, reinforced brigades.  Some Allied elements were discovered, while others remain hidden in Hanoverian territory. A clash was avoided in Wunsdorf when the Allied Light Brigade successfully withdrew (successful D6) to Hanover with no significant engagement.  August 1757 will undoubtedly prove to be far more entertaining than July.


Saturday, April 27, 2013

And now for something completely different - 1945 Action across the Rhine

Someone lift that bloody stonk!

I went over to long-time friend Dave's house the other evening for a 28mm WWII game. His long-time friend Sean was in town and Dave wanted to put little WWII Game on for Sean prior to him traveling back to the Caucuses. We used the Bolt Action rules, which despite their faults, provided a decent Platoon level skirmish game. Admittedly, we played fast and loose with the rules as I have only had a few BA games under my belt, Dave even less – and Sean none at all. We were able to play in Dave's beautiful new and expansive upper-story "Gentlemen's Parlor" dubbed The Eagles Nest. Besides the figures, paintings and military relics, I believe he has enough tables space for a 6' x 12" game (which could go 6'x18" given a supplemental table). For our game we stuck with a conservative 5' x 5'.
 
Dave had asked me to come up with a scenario and OOBs, and (despite our collective wealth of historical figures) we simply do not have much in the way of 28mm WWII. As Dave has a Platoon+ of Germans and British Paras, and I an equal number of British infantry and Eastern Irregulars (partisans) I determined to work up a Para-Relief Force link-up scenario. Initially I was looking to Normandy, but then thought of Operation Plunder and Varsity (Rhine Crossing) in March 1945 as something different. Some quick Research and I came up with the 8th Royal Scots link-up with Canadian Paras the day after the airdrop (see map below).  This scenario has desperate Germans remnants set up in the woods and Farm buildings at the western edge of the "Diersfordterwald" while Canadian Paras push through the woods in the northwest and a patrol of the Royal Scots enter form the southwest. Victory would be determined by the Commonwealth troops ability to link-up without taking casualties that would render them combat-ineffective.
 
The Paras were given a couple Veteran sections with some heavy weapons team (MMG and Medium Mortar) support as were the Royal Scots (MMG and Sniper). In addition, both Commonwealth players had an FO for an artillery Bombardment, and the Scots had two MMG armed Bren Carriers. The Wehrmacht had a two Regular Infantry sections with LMGs, an MMG, a Heavy Mortar and a Quad-20mm FLAK that could be mounted or dismounted. In addition the Germans had two inexperienced Volkssturm rifle squads, a small LMG squad and an Anti-Tanks Rifle (ATR) team. Every German squad was also armed with a Panzerfaust.
 
Dave took the Germans, Sean the Paras and I took the Scots. Dave asked if the Germans could use hidden /maps set-up, and though neither the scenario, nor BA rules really accounted for that, we agreed it might be interesting and so (excepting the Heavy Mortar and Quad 20mm FLAK) Dave jotted down his squad positions, to be kept hidden until engaged. Sean and I discussed some basic strategy, agreeing to probe the defenses and then link-up along the path of least resistance. With that, The Ball was opened.
 
Sean's Paras began moving along the northwest woods and hedgerow with a section in front, followed by support weapons and the second section behind. My Scots advanced with one section dismounted advancing through a wheat field, followed by Company leadership and supporting weapons teams. The other section was mounted in the carriers and began to flank to my right – the more open terrain out of LOS of the Quad FLAK. Dave's only initial fire, was a lucky Heavy Mortar direct-lay on my lead troops – handing my No. 1 Section 5 casualties and two pins. Blimey!
 
Dave and Sean exchanged fire in the north with Sean taking some losses, then shooting up Dave's Mortar crew. Dave fired on my hapless 1st Section with his hidden "Spandaus" sending the unlucky Scots reeling back through the Korn with over 50% loss and three pins total – these particular Jocks were now fairly done-in. Dave also began firing with his Volkssturm ATR at my Carriers as they moved to push the eastern flank - but the inexperienced Volks gunner could not get a hit. At this point Dave asked if his MG troops who had fired at me could conduct hidden movement in the buildings (therefore backing off and remaining hidden as they displaced) and to Sean's regret – I agreed. There are specific building rules in BA – but we typically ignored them for expediency sake. While having so much hidden set-up and movement for the Germans added a bit of realism and Fog-o'-War, it needed to be counter-balanced by non-existent BA rules consideration for things like "Searching Fire" and targeting "likely" locations - these we had not considered, as all of this was done on-the-fly.
 
Meantime, I managed to knock out the Volkssturm ATR and Sean, "Klatch-BOOM!", got a good PIAT hit on the SDKFZ, destroying it and the re-mounted FLAK. In addition, Sean began to tangle with some Volkssturm squads blocking the woods route. In this encounter, the veteran Paras first shot up then assaulted the inexperienced, armed civvies – but not before taking a few Para casualties themselves. In addition, Dave (via the hidden movement) had displaced his MGs to the northern side of the Farm to take Sean's Paras under marginally effective fire.
 
I had targeted a "known" German position with artillery, and Sean followed suit. But the fire missions failed to arrive for two turns. When my "Stonk" finally did come in it destroyed and unoccupied out-building that I had thought, through Dave's cunning deception, might have some Panzerfust armed Volkssturm inside - but instead had only a drunken Volks shirker whose hangover was rudely interrupted by a sheaf of 5.5 inch rounds.
 
At this point, Sean, while blooded, was still proceeding steadily through the Woods towards a link-up with my forces on the northeastern flank. I debussed my No. 2 Section in the southeast field and shot one of my carriers long up the eastern flank, while the other carrier supported with MMG fire. As expected, a flash and smoke shot out of the upper story of the eastern farm building and Dave's Panzerfaust got a solid hit on the thin-skinned carrier (indoor overpressure notwithstanding). The carrier went up in a ball of flame, shaking-up the already battered Scots. However, one carrier, a full squad and all Sots support weapons remained unharmed and so the dour Scots continued their advance.
 
At this point the evening was late and we determined to call it a night. The "wholly unbiased" assessment of the Scots commander was that albeit thoroughly blooded, the Canadians Paras and Scots would likely link-up on the eastern Flank within a few turns – though not without taking further casualties - significant overall. Therefore, given the Germans' tenacity, and heavy Commonwealth casualties a minor German victory would likely be the result.
 
A great time was had by all and much good German and Belgian beer was quaffed over a few fine cigars as we pursued the action. Still enjoy the BA mechanisms, though it is not without its quirks. Also, due to the card-like dice activation in BA, when playing a multi-player game with 20+ total elements engaged – you really have to keep thinks cracking to get through the turns. Recommendations for scenario refinements might be to either forgo or fully think through hidden movement and associated rules (if these modifications are allowed) and/or to provide the Scots a prelim bombardment or a Sherman DD tank (the Scots were historically supported by Shermans in this Op.) then give the Germans additional AT (a Panzerschreck or light/med AT Gun). Looking forward to more BA, but can't wait to fight a really big SYW, ACW or Napoleonic game in Dave's game room as those periods can really take advantage of the table-space.
 
In Memoriam:
As we play these games with our toy soldiers, it is good we occasionally reflect on the actual human cost of these operations. While doing my minimal research for this scenario – I came across the following.
 
Rest in Peace BRIAN TERENCE PECK. Born the same year as my father (who served in, and survived the Pacific war) but died far too young.
 
 
Dave and Sean discuss turn one move under the gaze of Bony

Scots advance

Mortars -  Hit the dirt!


Canadian Paras move our smartly

Paras take out the Mortar Team while Flak crew ducks behind cover

Dave consulting his hidden set-up positions

Scots debussed

Para advance meets Volksstruurm contact in the woods

Forward!

Destuction of the out-house

Panzerfaust!

Volksstrum Command

Para assault - the end of the Volksstrum

Two great commanders - then there is Dave and Sean :)

Skulking German AT Team

At 'em Jocks!

Klatch-Bang!  Piat hits home